|
CAPS Universe documentation
1.0.4
All you need to know to be successful
|
|
CAPS Universe documentation
1.0.4
All you need to know to be successful
|
Sometimes the default rules how to print a document onto the available medium doesn't match your needs.
In this case additional printing parameter can force a specific behaviour.
If the automatic rotation applies annoying things to your print you can overwrite it on a per print job base by the orientation-requested printing parameter.
This orientation-requested printing parameter forces a specific orientation of your document's content on the print medium.
orientation-requested is '3'
This does not change the default view orientation and will print the document in exactly this orientation to your available medium.
If the document's default view orientation:
orientation-requested is '4'
This will rotate the default view orientation 90 ° counterclock-wise and will print the document in exactly this orientation to your available medium.
If the document's default view orientation:
orientation-requested is '5'
Like '4', but will rotate the default view orientation 90 ° clock-wise and will print the document in exactly this orientation to your available medium.
If the document's default view orientation:
orientation-requested is '6'
Same as '3', but instead the document's short or long bottom edge will be printed to the top of the print medium's leading edge.
If the document defines a somehow smaller page than the print medium is, you can align it to one of the print medium's edges.
The printing parameters are: align-left, align-right, align-top, align-bottom
align-left, align-right, align-top, align-bottom align-left align-bottom to align the document's to the left bottom on the print medium.In this example a document in Letter format should be printed on A4 paper. Alignment here is regarding the content of the document page. E.g. align-left skips more content at the document's right edge in favour of its left edge.
align-left, align-right It works in the same way for the vertical axis. They keywords here are align-top and align-bottom.
If the default doesn't satisfy you, and size accuracy isn't what you need, scaling can be an alternative for the best printing result. Scaling is always done on the format of the available print medium or on the so called imageable area of the print medium. The imageable area is defined by the capabilities of your printer. Or to be more precise: of the margins your device requires for a specific medium format.
The following image shows the difference.
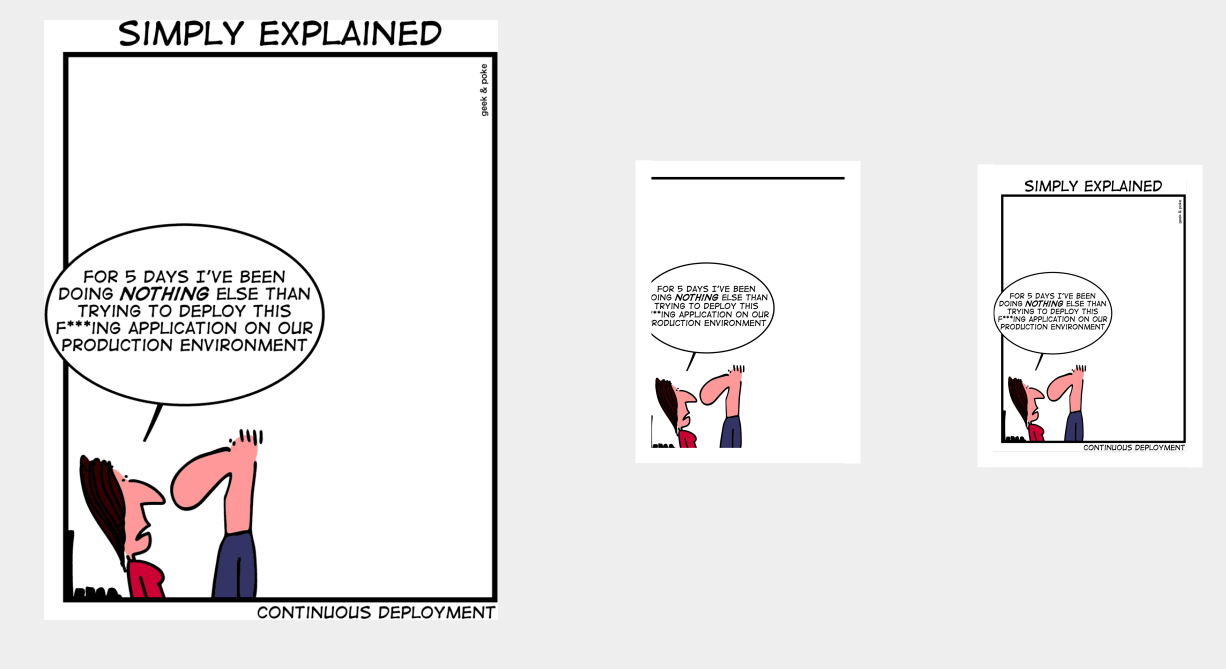
Left is the original image, with content near to its edges. In the middle, this image gets scaled down to the format of the print medium. As you can see, some content near to the edges is lost due to the margins which cannot be marked. The right image is scaled down to the imageable area and all content remains.
Scaling keeps the aspect ratio of your document's page.
Use the printing parameter scale-to-fit to scale your document content to the print medium size or use auto-fit or fit-to-page to scale your document content to the imageable area.
