|
CAPS Universe documentation
1.0.4
All you need to know to be successful
|
|
CAPS Universe documentation
1.0.4
All you need to know to be successful
|
Continuous labels are simple to create: Just create a label with the exact size of your continuous roll paper. E.g. with its exact width.
The margin at the left and right borders you should not print to, are about 0.5 mm. There are no margin requirements at the top and bottom borders.
Example:
You are using a DK2113 roll. It provides a medium width of 62 mm. You define a label with 62 mm width and 100 mm length.
Your printable area on this label is 61 mm wide and has a length of 100 mm.
The size of this label after the printer has spit it out is 62 mm wide and has a length of 106 mm.
Pre-cut labels are a bit more complicated. The printers have some annoying behaviours, which we must honor to get an expected result.
First we must create a label of the exact size of the pre-cut labels of our DK roll. Since the printer adds some margins by itself, we now need to define exact margins. We need to know, the printer will always add 3 mm at the top and the bottom of each label. So it depends on the orientation of our label, where we need to honor these margins.
If we use a pre-cut label DK roll oriented in portrait, the 3 mm margins are at the short edges. For DK rolls oriented in landscape, the 3mm margins are at their long edges.
The margins at the other edges are about 0.5 mm (drop me a note, if this isn't always true). But refer Assumptions about the Print Head for more details.
With this rule it should be easy to define the correct margins, independently of your label's orientation.
You may also read the How the driver deals with margins
Example:
You are using a DK1201 roll. It provides pre-cut labels of the size 29 mm by 90 mm. Orientation on the roll is portrait. Thus, you need the 3 mm margins at the 29 mm edge.
You can create a label in landscape (29 mm height, 90 mm width), with 3 mm margins at its left and right edge and 0.5 mm at its top and bottom edge. But regarding the top and bottom margins also refer Assumptions about the Print Head for more details.
What happens, if you create a larger label than the pre-cut label is? The printer won't be able to cut inbetween labels! It will cut inside the next label instead.
After that is happen, you must manually remove this remaining label, else the printer can no longer feed it correctly.
Solution: Pull out the DK roll from the printer and manually cut the tape at the intended position, and insert it into the printer again.
Here a more specific description how to setup the margins if you want to use labels in landscape orientation, but the DK roll provides only portrait orientation.
If the dot count in a line in the raster exceeds the maximum of 720 dots the QL print head has, the filter removes the same amount of dots at the left and right line ends and sends exactly 720 dots to the QL printer device.
If the dot count in a line in the raster is below the maximum of the selected medium (or the maximum dots of the QL print head), it will right align the available dots per line and sends the result to the printer device.
For continous labels, all raster lines are sent to the printer device. You do not need margins at the top and bottom edge. The QL printer device itself will add 3 mm at both ends and then cut the label.
For pre-cut labels the filter always ignores 3 mm of data at the top and at the bottom of the raster. At 300 DPI this means 35 lines each and at 600 DPI (only some QL models) 70 lines each. The remaining raster lines are sent to the printer device. For this case you need to add these 3 mm margins to your label, e.g. it must provide lines for the full size of the label.
With the QL8xx printer models and the special DK roll DK2251 a nice feature came in - bi-colour print: black and red dots on white paper.

In order to print in this mode you need:
Bi-colour print mode ins't perfect. See what you can expect.
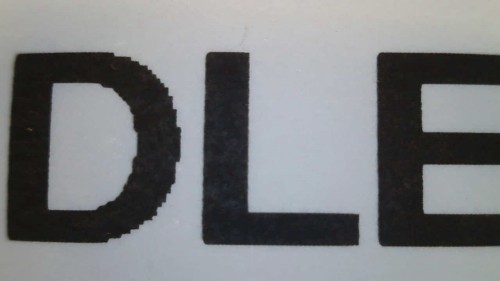
First how it looks like with black-only capable label. This image shows a DK1201 roll print:
The bi-colour DK2251 roll turns to red when the print head applies a low energy to it and still turns to black with high energy.
Since two temperatures (low and high energy) are used to create dots on this special medium, there are some interferences: using high energy (or high temperature) will cool down around the location the high energy was applied to. As a result, the area around a black dot turns to red as well: around all black areas will be some kind of red shadows.
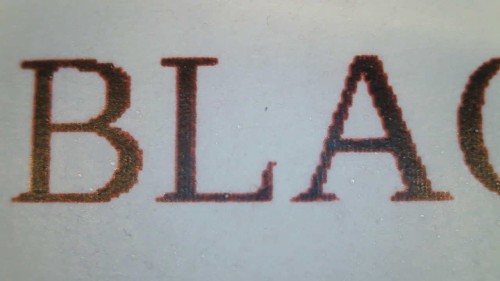
This image shows a DK2251 bi-colour roll with a black area:
Vice versa: applying low energy seems not perfect and results in red areas with some black noise in it.
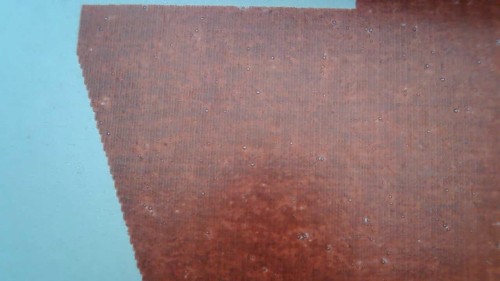
This image shows a DK2251 bi-colour roll with a red area:
If you can live with these imperfections, the DK2251 roll is a nice "add-on" for label printing.
In order to print bi-coloured, the printer filter needs to separate black and red areas in your document. And it isn't as such easy to detect a red as it seems at first.
Red from the printer filter's point of view, has in the HSV colour model (https://en.wikipedia.org/wiki/HSL_and_HSV) a:
Refer ql_red_detection for details what has to be changed regarding the red detection.
If you change them, you need to restart the printer driver.
At least the QL8 series of printers have some kind of power save features.
When the printer is idle for a while, it switches itself off and disappears from your host's USB.
It is a little bit annoying, since this is called a power save feature. While it is correct (it really saves power!), the printer is silently gone from your host system. You cannot print anymore until you manually switch it on again through its power button.
You can change/adapt this behaviour via a selection from the PPD's Power Off Timeout menu.
You can select a time between 10 minutes and up to 60 minutes (in steps of 10 minutes) in idle after it powers off. And it is possible to disable this feature entirely here as well.
Powering the device can lead to an active printer device or a still disabled printer device. Active means, the printer is visible at your host's USB immediately. Still disabled means, it is invisible at the USB and requires an additionally and manually triggered power-on by its local power button.
You can change/adapt this behaviour via a selection from the PPD's Power Connect Behaviour menu.
You can select Default (e.g. don't change), Go online (e.g. active) or Keep offline (e.g. disabled).
The following list shows the INI files read-in by the QL printer drivers. Some of the shown INI files use generic names, see below.
| INI File name | Meaning | Expected Location |
|---|---|---|
| caps.ini | Shared initialization | CAPS Configuration Directory |
| capsdriver.ini | Shared class initialization | CAPS Printer Driver Configuration Directory |
| devicedriver.ini (see note) | Device Description | CAPS Printer Driver Database Directory |
| feature.ini (see note) | Driver Feature Configuration | optional, CAPS Printer Driver Configuration Directory |
| parameter.ini (see note) | Printing Device Parameters | CAPS Printer Device Parameter Directory |
devicedriver.ini is only an example name for a Device Description INI file. Its real name correlates with the printing device. feature.ini is only an example name for a Driver Feature Configuration INI file. It is defined in the devicedriver.ini and is optional. parameter.ini is only an example for one of the Printing Device Parameters INI files. All INI files from the physical printing device's directory are read-in. For the caps-brother-ql* printer drivers the mentioned feature INI file is
brother-ql-driver.ini The mentioned parameter INI file is always device dependend.
The following settings makes sense in a printer device specific way.
The QL8xx printers cannot detect if this special medium is loaded. This setting is for convenience, since you can always select this medium before printing. If you enable this setting, it only changes the defaults.
| Section | Variable |
|---|---|
| features | colourmedium |
Values:
true false Boolean variable. If true, the bi-colour DK225 cassette is loaded instead of a monochrome one. If not defined, the default is a monochrome capable cassette (e.g. false).
The following settings adapt the behaviour of the printer driver. Most of them are already set in the printer's Device Description INI file (refer CAPS Printer Driver Database Directory) to a useful value to reflect the features a printer has. Most of the time there is no need to change them.
Some printers can be configured in their way of power control. This setting
| Section | Variable |
|---|---|
| features | powerctrl |
Values:
true false This boolean key enables an additional selection in the printer description PPD. It enables the user to define the auto power on and auto power off behaviour of the printer. The default of this selection is always "don't change", but can be set to a different value prior a print job.
Internally used to define various buffer sizes and process the print data.
| Section | Variable |
|---|---|
| features | bytesperline |
Values:
90 162 Internally used to define various buffer sizes and process the print data. Corresponds more or less to the bytesperline keyword. It defines the dots of the printer's print head.
| Section | Variable |
|---|---|
| features | dotcount |
Values:
720 1296 Used to bring the printer device into a well known state, e.g. reset it. Various printer models have different requirements about the amount of empty and leading bytes to be sent before sending the real print data.
| Section | Variable |
|---|---|
| features | leading_bytes |
Values:
200 (for QL5xx)400 (for QL8xx)Boolean variable if the printer device has the feature of bi-colour printing support. Currently only the QL8xx family of printer devices has such an feature. If not defined, the default is false
| Section | Variable |
|---|---|
| features | bicolour |
Values:
true false When the bi-colour support is enabled, the printer driver needs additional information to be able to rip black and red dots.
| Section | Variable |
|---|---|
| bicolour | lower_red_angle |
| bicolour | higher_red_angle |
| bicolour | lower_red_saturation |
| bicolour | lower_red_value |
Refer What's Red? for useful values of these settings.
Some printers are capable to print at 600 DPI vertically. If this boolean is set, the printer is capable to print in this higher resolution. If not defined, the default is false
| Section | Variable |
|---|---|
| features | highresolution |
| Section | Variable |
|---|---|
| features | manualcutter |
Values:
true false | Section | Variable |
|---|---|
| features | autocutter |
Values:
true false The QL printers cassetts have some encording in their foot. With this feature, the printer can detect the loaded cassette by its own and can report the size and type of label it currently can print to. The printer driver can read-back this encoding and thus, is able to report the correct label size and type to the user.
Over the time, the amount of encoding bits has increased. The QL500 for example comes with 5 bits to encode the loaded cassette, while the QL800 has 6 bits for the same purpose. The value of this setting is used to mask unsupported bits to always report the correct loaded cassette.
| Section | Variable |
|---|---|
| features | cassette |
Values:
5 (QL5xx)6 (QL8xx)
| Section | Variable |
|---|---|
| features | minlength |
| features | maxlength |
| features | minwidth |
| features | maxwidth |
| Section | Variable |
|---|---|
| margins | margin_large_left |
| margin_large_right | margin_large_top | margin_large_bottom
These settings are derived from the printing framework and thus, are valid for the QL printer drivers as well.
| Section | Variable |
|---|---|
| features | priority |
Values:
'0': No change in driver's process priority'1…19': Adapt the driver's process priority to a lower priorityThis entry can lower the priority of the driver. For the time of processing the print job, the driver may consume many CPU cycles, which can disturb other activity in the system. By lowering its priority this can be mitigated. The value set here is the so called nice level. Refer "man nice" for further details on it.
| Section | Variable |
|---|---|
| interface | buffer_size |
Values:
1024 means 1024 kiBIf defined, the printer data buffer is extended to this value. E.g. the printer gets the printing data in one turn of this size instead of many small pieces.
The time out especially can happen if the printer starts printing immediately when the first printing data arrives. Some printers cannot stop a printing activity once it has started. The printer then needs a continuous stream of data to continue and to finish the printing activity. Increase the buffer size if you face this kind of trouble.
The default value is 128 kiB if this setting isn't made in any INI file. It it also limited to max. 8 MiB (refer PRINTER_STREAM_BUFFER_DEFAULT_SIZE and PRINTER_STREAM_BUFFER_MAX_SIZE for the settings).
The printer driver is free when to flush the printing data buffer. It can flush the printing data buffer at the end of each processed page (for simplex print and on demand even for duplex print) or after two processed pages for duplex print. This is printer device dependend and should already be handled by the printer driver.
Monitoring means the printer's status gets read (periodically) in order to be able to report the printer's state to a user. Think about the paper tray is empty and needs to be refilled. The paper tray can be empty while a new printing job should start or it can be empty while already printing. Thus, it makes sense to monitor the printer's status periodically.
But the world isn't perfect and some printers are in trouble if you retrieve their status too often. There are known printers in the field, where a status read destroys the printer's buffer content which makes the print fail.
| Section | Variable |
|---|---|
| features | monitor |
Values:
always never idle always
Monitor the printer device:
never
Never monitor the printer device.
idle
Monitor the printer device:
This setting can control how to monitor the printer. A printer which is perfect can live with the always setting. In this case it gets monitored even in idle state. Some printers report their transition into the power save mode while idle for a long period of time. With always this transition will be reported to the printing coordinator and can be retrieved by clients. With this setting an empty paper tray will be reported immediately. The same is valid for all kind of paper jam or other types of errors which can happen at the printer's side while printing.
The never setting is the opposite of always. With this setting there will be no disturbance of any printing activity, but no status reports for clients as well. Even if the paper tray is empty, there will be no warning for a client about this fact.
Some printers are in trouble only if they currently are printing when their status should be read. With the setting idle monitoring is restricted to the idle period only. Monitoring is stopped prior the printing of the first page and continued after the last page was printed, e.g. the next idle period is started.
If this setting isn't made, the default behaviour is always: the printer is expected as perfect.
If an invalid setting is made instead, it defaults to never to be safe.
You can add this INI setting into
For what events are monitored refer the internal function caps_drv_printer_check().
Define the default halftone processing method for monochrome prints.
From Wikipedia:
Halftone is the reprographic technique that simulates continuous-tone imagery through the use of dots, varying either in size or in spacing, thus generating a gradient-like effect.
| Section | Variable |
|---|---|
| features | halftone |
Values:
none ordered fls jjn Method: Simple threshhold
This method has no grey scale emulation at all. Pixels below a fixed threshhold are printed, pixels above this threshold aren't.
For simple black text or graphics to print, this method might be sufficient. But for coloured text or grey scale graphics it might skip complete content and the printed result isn't what you expect (at least most of the time).

Method: Bayer Pattern
Method: Floyd and Steinberg
This is a so called "error diffusion" halftone method and the most popular one. Its result is very good for text and graphics and it has less visible artefacts on large areas with the same grey scale.
Method: Jarvis, Judice, and Ninke
This is a so called "error diffusion" method and similar to the fls one. Its result is very good for text and graphic, but it has visible artefacts on large areas with the same grey scale.

